
10 Fun Penguin Art Crafts For Kids
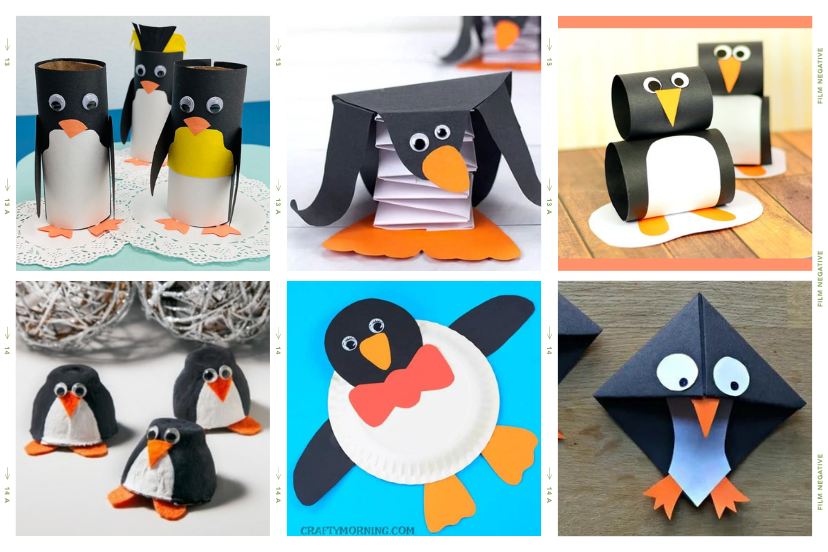
I’m excited to share some delightful penguin art craft ideas for kids. Penguins have captivated the imaginations of children and adults alike with their adorable waddle and charming personalities. Engaging in art and craft activities not only fosters creativity but also enhances cognitive and fine motor skills in children. In this article, we’ll explore ten different penguin art crafts that will keep kids entertained while nurturing their artistic abilities.
Why Kids Penguin Art Crafts Are Fun
Penguin art crafts offer a perfect blend of creativity and fun for kids. These activities allow children to learn about penguins, their habitats, and unique characteristics while engaging in hands-on artistic expression. By working on these crafts, kids can develop their fine motor skills, enhance concentration, and boost their self-esteem as they create something unique and visually appealing.
Materials Needed
Before we dive into the exciting world of penguin art crafts, let’s gather some essential materials that will be needed throughout the projects. Here’s a list of commonly used materials:
- Paper plates
- Cotton balls
- Popsicle sticks
- Smooth rocks
- Cupcake liners
- Washable paints
- Glue
- Scissors
- Markers
- Construction paper
- Googly eyes
- Feathers
- Paper bags
- Egg cartons
- Clay
Make sure to have these materials handy before starting the craft projects.
Craft 1: Paper Plate Penguin
Step 1: Take a white paper plate and cut it in half.
Step 2: Paint the flat side of the paper plate half black to create the penguin’s body.
Step 3: Cut out two small ovals from black construction paper and glue them near the top of the paper plate for the penguin’s eyes.
Step 4: Cut a small triangle out of orange construction paper and glue it below the eyes to make the beak.
Step 5: Secure a pair of orange construction paper feet onto the underside of the paper plate.
Step 6: Cut out wings from black construction paper and attach them to the sides of the paper plate penguin.
Step 7: Your adorable paper plate penguin is ready! Display it proudly or use it as a decoration.
Craft 2: Cotton Ball Penguin
Step 1: Take a piece of black construction paper and cut out the shape of a penguin’s body.
Step 2: Glue cotton balls all over the body shape to create the penguin’s fluffy appearance.
Step 3: Cut out white construction paper ovals for the penguin’s eyes and glue them onto the body.
Step 4: Use black construction paper to cut out smaller ovals for the pupils and glue them onto the white ovals.
Step 5: Cut a small orange triangle out of construction paper for the beak and glue it onto the body.
Step 6: Finally, cut out two orange feet and attach them to the bottom of the penguin’s body.
Step 7: Your cute cotton ball penguin is complete! Display it or give it as a gift to someone special.
Craft 3: Popsicle Stick Penguin
Step 1: Take three popsicle sticks and arrange them in a triangle shape, slightly overlapping at the top.
Step 2: Glue the popsicle sticks together to secure the triangle shape.
Step 3: Paint the entire triangle black to form the penguin’s body.
Step 4: Cut out two white ovals from construction paper and glue them near the top of the triangle for the eyes.
Step 5: Use a black marker to draw smaller circles within the white ovals to create the pupils.
Step 6: Cut out an orange triangle for the beak and glue it below the eyes.
Step 7: Cut out two orange feet from construction paper and attach them to the bottom of the popsicle stick triangle.
Step 8: Your popsicle stick penguin is now complete! You can attach a string or magnet at the back to hang or display it.
Craft 4: Rock Penguin
Step 1: Find a smooth rock of suitable size for the penguin’s body.
Step 2: Paint the rock black, covering the entire surface.
Step 3: Once the black paint is dry, use white paint to create a white oval on the rock for the penguin’s belly.
Step 4: Use black paint to draw two small ovals within the white oval for the eyes.
Step 5: Use a small brush and black paint to create a beak below the eyes.
Step 6: Add orange feet using orange paint on the bottom of the rock.
Step 7: Let the paint dry completely, and your rock penguin is ready! You can place it in your garden or use it as a paperweight.
Craft 5: Cupcake Liner Penguin
Step 1: Flatten a black cupcake liner by pressing it gently.
Step 2: Glue the flattened cupcake liner onto a piece of white paper to create the penguin’s body.
Step 3: Cut out two small ovals from white construction paper for the eyes and glue them onto the cupcake liner.
Step 4: Cut out smaller black ovals for the pupils and glue them onto the white ovals.
Step 5: Cut an orange triangle out of construction paper for the beak and glue it below the eyes.
Step 6: Cut two orange feet from construction paper and attach them to the bottom of the cupcake liner.
Step 7: Your charming cupcake liner penguin is complete!
Display it on a colorful background or use it as a decoration for cards or scrapbooking projects.
Craft 6: Handprint Penguin
Step 1: Paint the palm and fingers of your child’s hand with black washable paint.
Step 2: Carefully press their hand onto a piece of white paper, making sure to keep the fingers slightly spread apart.
Step 3: Once the paint is dry, use black and orange markers to add details such as eyes, beak, and feet to the handprint. Alternatively, you can cut out the eyes, beak, and feet from construction paper and glue them onto the handprint.
Step 4: Your handprint penguin is now complete! You can frame it or use it as a personalized artwork.
Craft 7: Paper Bag Penguin Puppet
Step 1: Take a black paper bag and position it with the opening facing upward.
Step 2: Cut out two white ovals from construction paper and glue them near the top of the bag for the penguin’s eyes.
Step 3: Use a black marker to draw smaller circles within the white ovals to create the pupils.
Step 4: Cut an orange triangle out of construction paper for the beak and glue it below the eyes.
Step 5: Cut out two orange feet from construction paper and attach them to the bottom of the bag.
Step 6: Decorate the bag further by adding wings, a bowtie, or any other accessories using construction paper.
Step 7: Slip your hand inside the paper bag and use it as a puppet to bring your penguin to life.
Craft 8: Egg Carton Penguin
Step 1: Cut out one section of an egg carton to use as the penguin’s body.
Step 2: Paint the body section black, covering the entire surface.
Step 3: Once the paint is dry, glue two googly eyes near the top of the egg carton section.
Step 4: Cut an orange triangle out of construction paper for the beak and glue it below the eyes.
Step 5: Cut out two orange feet from construction paper and attach them to the bottom of the egg carton section.
Step 6: Your adorable egg carton penguin is now complete! Display it or create a miniature penguin family using multiple egg carton sections.
Craft 9: Footprint Penguin
Step 1: Prepare a piece of white paper and black washable paint.
Step 2: Dip your child’s foot into the black paint, making sure the entire sole is covered.
Step 3: Press their painted foot firmly onto the white paper to create a footprint.
Step 4: Once the paint is dry, use black and orange markers or construction paper to add eyes, beak, and feet to the footprint.
Step 5: Decorate the surrounding area with snowflakes or other winter-themed elements using markers or colored pencils.
Step 6: Your footprint penguin artwork is now complete! Frame it or use it as a personalized greeting card.
Craft 10: Clay Penguin
Step 1: Take a small piece of black clay and shape it into a rounded body for the penguin.
Step 2: Roll another smaller piece of black clay into a cylinder shape for the head and attach it to the body.
Step 3: Use a toothpick or small sculpting tool to create details such as eyes, beak, and feet on the clay penguin.
Step 4: If desired, you can use additional colors of clay to add a bowtie, hat, or other accessories to your penguin.
Step 5: Bake the clay penguin according to the instructions on the clay packaging to harden it.
Step 6: Once the clay has cooled, you can further enhance your penguin by painting it with acrylic paints or adding a glossy sealant for a polished finish.
Step 7: Showcase your clay penguin on a shelf, utilize it as a practical paperweight, or present it as a heartfelt handmade gift to someone dear.
Conclusion
Engaging children in penguin art crafts not only sparks their creativity but also provides them with a sense of accomplishment. Through these fun and hands-on activities, kids can learn about penguins while developing their artistic skills and exploring their imagination. From paper plate penguins to clay sculptures, each craft offers a unique way to express creativity and create delightful penguin-themed artworks. So gather the materials, let your child’s creativity soar, and enjoy the process of creating adorable penguin crafts together.
FAQs
Q1: Are these penguin art crafts suitable for all ages?
Yes, these penguin art crafts can be enjoyed by children of various age groups. However, younger children may require more adult supervision and assistance with certain steps.
Q2: Can I substitute the suggested materials with alternatives?
Absolutely! Feel free to use alternative materials based on what you have available or prefer to work with. The crafts are flexible, allowing for creativity and personalization.
Q3: How long do these crafts take to complete?
The duration may vary depending on the complexity of the craft and the child’s age. Generally, each craft can be completed within 15-30 minutes, excluding drying or baking time for certain materials.
Q4: Can these crafts be used for themed parties or classroom activities?
Definitely! These penguin art crafts are perfect for themed parties, classroom activities, or even as engaging projects for homeschooling. They provide a fun way to incorporate educational elements while encouraging creativity.
Q5: Are these crafts safe for kids?
Most of these crafts are safe for children when used under adult supervision. However, be cautious with small parts like googly eyes and ensure age-appropriate materials are used to avoid any potential hazards.
Remember to have fun, encourage your child’s creativity, and enjoy the process of creating these delightful penguin art crafts together!


